
Have you ever wanted to make your own Fullmetal Alchemist military uniform? I will detail exactly how I made my own from scratch. I will prove that you don't need a lot of experience (this is actually the first thing I've ever sewn by myself) and you also don't need fancy things like commercial patterns and dressforms. I drafted all the patterns myself so if you are attempting to make your own make sure to get your measurements correct. First off I want to thank AndSewingisHalftheBattle for all the info they had on how to make the uniform. I used it as a guide and made a few adjustments and improvements along the way.
Components
Jacket - the jacket will give you the most trouble by far. It's quite boxy in shape and has an overlapping front panel that had a fold down rectangle. There are two epaulets, one on each shoulder. The cuffs fold up and have a V-shaped slit in them.
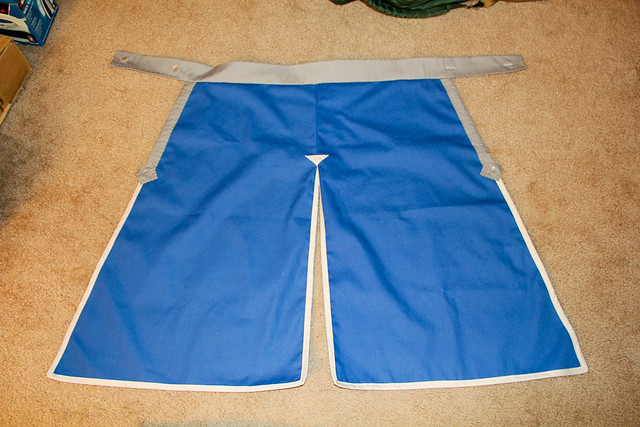
Pants - fairly regular looking slacks except that they appear to be a bit wider at the bottom where they tuck into the boots.
Butt cape - this is what everyone else calls the thing that wraps around the waist and goes all the way down to the shins. Open on the front and the back has a long slit running from the bottom up to about 1/3 of the way down from the top.
Boots - there's some debate on what type of boots they wear. All the source images I found showed the boots as being totally smooth meaning there are no laces.
White gloves - not much to say here. Find white cotton gloves that fit, nothing fancy.
I have a link to the PDF file of the pattern I drafted so make sure to check out that file. Just scroll down a bit to find it.
Materials
Fabric
- Royal Blue Bottomweight Canvas from Jo-Ann Fabrics
- Shadow colored extra wide double fold bias tape (Wright's) - I used 3 packages
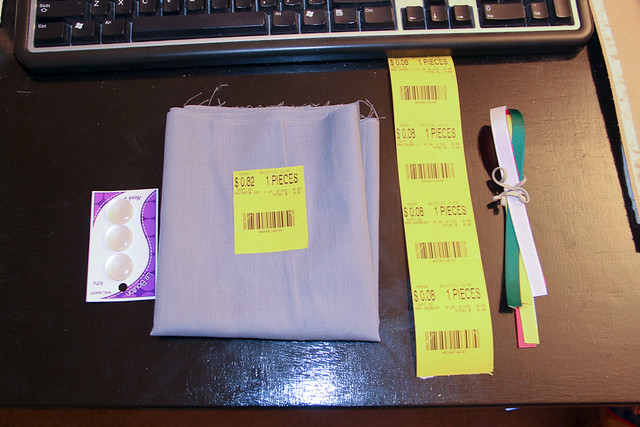
- gray cotton/poly fabric from Wal-Mart - half a yard is plenty
- heavy and medium weight interfacing
Other materials
- Gold cord from Jo-Ann
- Various buttons
- 6 star buttons for the epaulet
- 4 gold circular buttons, two for the epaulet and two for the front rectangular flap
- 2 large flat grey/silver buttons for the waist
- 2 small grey/silver buttons for the front of the butt cape, sits in the square
- White gloves from Walgreens
- Black boots from the thrift store
- ribbon from Walmart
- need green, white, yellow, red
- plastic from a yogurt container
- aluminum can
- safety pins for the backs of the pins
- hot glue gun with hot glue sticks
- *wig for those who do not have hair similar to whichever character you're cosplaying as
Total cost: ~$70
I went with the bottomweight canvas because it's got some weight to it. Military uniforms tend to be nice and crisp so you need to get interfacing for a few areas which I'll talk more about later.
One of the things you may be wondering at this point is "how much fabric do I need?" I bought 8 yards of the royal blue fabric but I ended up using just over 5 yards of it. I'm about 5' 5" so for most people 6 yards should be enough. A word of caution though - always err on the side of buying more since you don't want to be working on this the night before a convention only to find you ran out of fabric and the fabric store is closed. Also, if you want to save money sign up for Jo-Ann's e-mail list since they frequently have print out coupons. You should never buy anything there without at least a 40% off coupon.
I used bias tape for all the trim on the uniform but I had a hard time matching the gray of the bias tape with fabric that I needed for the belt part of the butt cape. I've seen some people make all the bias tape themselves which would make it a lot easier when trying to match all the trim color. I don't have the tools for making my own bias tape so that's why I had to find separate fabric for the other areas where I needed wider lengths of fabric.
At this point I want to discuss the colors for the uniform. I'm basing the costume on the art from the manga which FMA Brotherhood follows so you can use either one for sources. The color of the uniform is generally considered a royal blue and the trim is gray, not silver. Boots are black, gloves are white. You're free to pick a different shade of blue but it's always good to take a picture of the fabric before buying since you want the cosplay to photograph well in addition to looking awesome in person.
Drafting the patterns

I have a math minor but anyone who's done any amount of sewing will know that having a math degree is a totally moot point and does not make you a better seamster/seamstress. It does help to be able to visualize things in your head if you're planning on drafting the pattern. There is another method called draping in which you literally drape fabric over a dressform or dummy that's about the same shape as you and then make your patterns that way. As an engineer it's more intuitive for me to plan everything out before proceeding so drafting is the method I used. No matter which method you use, it's generally a good idea to use muslin to make a prototype since it's pretty cheap. I skipped this step so I guess it's not totally necessary.
Here's a link to the FMA Uniform Pattern I drew up in Illustrator.
I didn't include pants because they're not that difficult and it's easier for you to find a pair of your own pants to base it on. Please note that all of the measurements I provided are for myself. I'm 5' 5" and weigh 135 lbs. so those measurements will obviously not work for everyone. It should serve as a very good starting point for anyone that's planning on making this. I haven't included any seam allowances in that file.
I found a really good site for drafting sleeves (apparently this link is now dead but I'm sure this information shouldn't be too difficult to find).
Always prewash your fabric. This prevents things from getting warped if it shrinks during washing. One thing most people say is to not let it dry in the dryer. I tossed it in there for a bit but took it out when it was still damp and let it air dry.
This is what 8 yards of fabric rolled out looks like.
I taped a bunch of pieces of paper together to draw up the pattern.
I drew out all the patterns on paper first and then after I had everything measured out I transferred them to the fabric using chalk. I used a few different methods for areas that were not just straight lines. The most complicated method was used on the sleeve caps which involved measuring out different distances and then drawing a series of arcs. The collar area was drawn using a traced outline of a collar from one of my shirts. The curve for the sleeve opening was free handed (not a recommended method).
One important thing to keep in mind is that when you transfer your pattern, draw in seam allowances that are the same all the way around to ensure the final thing comes out nice and neat. I believe standard seam allowance is 5/8 in. You can also make V-shaped cuts to help with lining up two pieces that need to be joined. Much of this information can be found in other sources so I won't go into too much detail here.
Pants
The pants seemed pretty easy so I started with the pants. I turned a pair of my khakis inside out and studied it very carefully. I used the khakis as my model for making the pattern. What I basically did is tape a bunch of pieces of paper together, lay the pair of khakis on top and traced as close I could for the front and back of the leg. You need one pattern for the front and one for the back of the leg. Since the two legs should be made the same, you can use the pattern for both legs. That means in total you will need two fronts and two backs totaling four pieces of fabric when cut out.
A couple of things to point out for the pants: there is a high waistband on the pants and the bottom is flared out to make it seem fuller when being tucked into the boots. I don't believe that there is any sort of clasp or button for the top of the waistband in the reference images so that's how I made it.
The fabric is folded in half at this point so I can trace once to cut out two pieces. I pinned the two layers together so they wouldn't shift when I cut them out. Make sure to use sharp scissors (one of the most important tools when doing textile work).

Of course you should do all the sewing on the inside and then flip it inside out.
I didn't really take many pictures of the sewing process of the pants since it's pretty straight forward. Just sew along a straight line. I think the most tricky part was the zipper since I've never done it before. I don't have much advice other than to do some research (there's probably some good videos out there).
Here in this image of the front of the pants you can see that I flared out the pants toward the bottom for where it would tuck into the boots.

Just a view from the back.
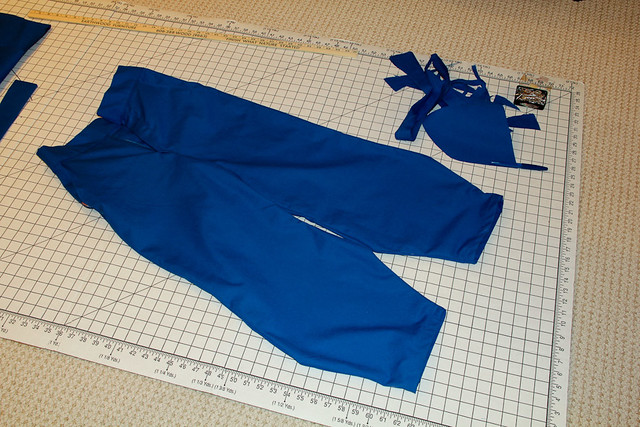
Trying to show that I put a pocket in the back right so I can keep my wallet there.
I used a pair of boxers for the pockets. The material for boxers is very similar to what's actually used to line the pockets of the khakis I had. I just studied the khakis thoroughly to come up with a way to make the pockets.
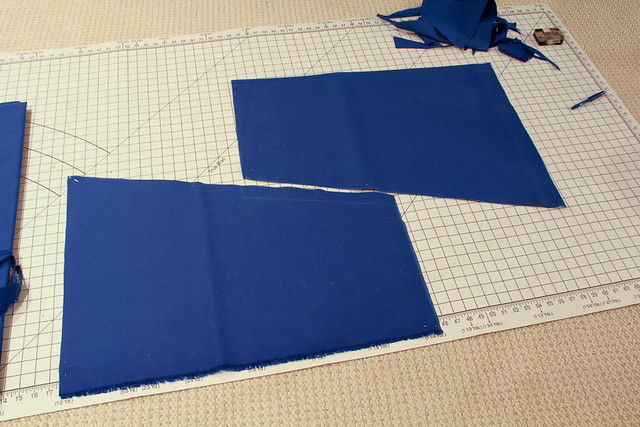
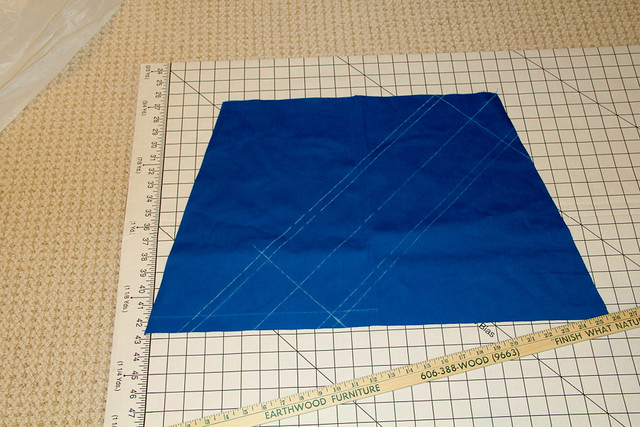
Butt Cape
This is probably the easiest part of the uniform since it's just two trapezoids stitched together with another rectangle of fabric on top. Draft the butt cape such that it's longer in the bottom compared to the top. This is called an "A-line" and is supposed to be more flattering for the figure.
The fabric is still folded in half and I used the same method where I pinned the two layers together along where I need to cut to make sure the fabric doesn't shift around too much when cutting it.

The trapezoids cut out.
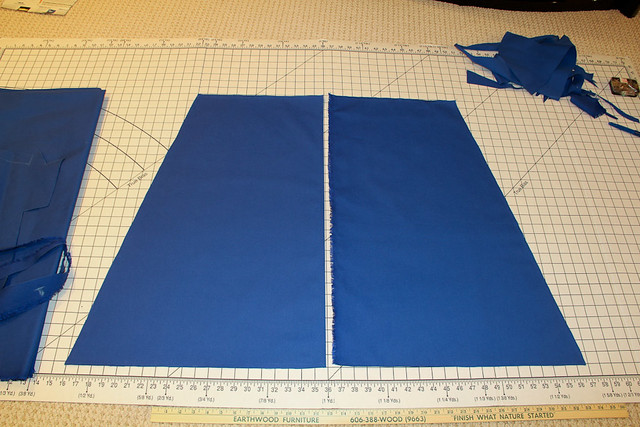
This is what it looks like sitting next to each other. I don't really have another image because there's not that much to show. I sewed the two panels for each half together such that I had a left and right half that was each 2 layers of fabric thick. I then added bias tape all the way around (except for at the top and a bit down the middle where the two halves would come together anyways). After that I just stitched the two halves together.
The original fabric I was going to use for the belt part was a satin fabric that was silver but I ended up going with some other gray cotton fabric since it's easier to work with.
This is the cotton fabric that I ended up using. The color looks a bit weird in this picture but it's gray.
I didn't have access to my sewing machine for the belt part so I had to do it by hand. It's really easy if you have a machine. I added some medium weight interfacing so the belt would stay flatter. The belt should start at one side of the waist, go all the way around and overlap across most of the front. The placement of the two buttons in the front should be lined up as much as possible with the edge of the butt cape in the front where it goes down. There is also a thicker line of trim that goes down the front and ends with a square that also has a button. There is a triangle in the back with the base of the triangle on top and the tip touching where the butt cape begins to split. You can see the triangle in this image of the butt cape from the back.
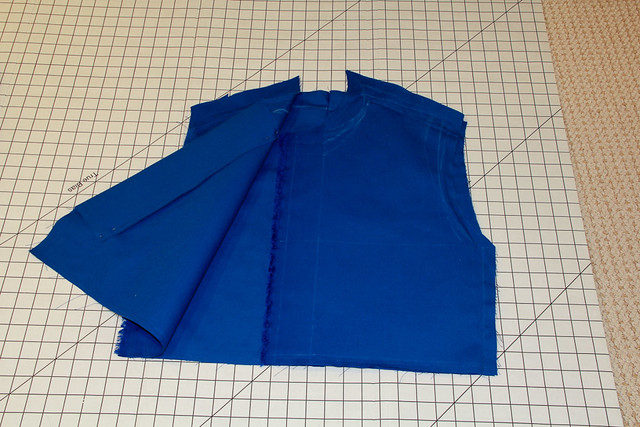
Jacket
By far the toughest part of the entire project. It's shaped like a box so it doesn't need to be that tight towards the bottom. It only goes down to just past the belly button and should not go down to the hips. The left panel folds over the right. The left panel goes diagonally across the front with a rectangle that folds down in the front. Roy Mustang wears a white dress shirt underneath.
The sleeves being drafted. The left side shows the base lines that I used to draw the curves that would be the final pattern on the right.
The two patterns on the top are for the back of the jacket.

This shows the front left panel chalked onto the fabric. I had to draw the collar and sleeve area over a few times.

It's hard to see but I have the pattern traced onto the interfacing here. This is the medium weight interfacing which I used on the entire front of the jacket. No interfacing on the back.

Interfacing cut out. I used fusible interfacing which means that you can iron it on. I interfaced the layer of fabric that would be closest to the body when worn. This means that in order from closest to the body would be: fabric, interfacing, gap, fabric. This way it will look more natural when worn. If you have interfacing directly on the layer that's seen on the outside it will appear very stiff and unnatural.

Inside view of the back of the jacket.

Inside view of the front of the jacket.
Inside view of the front of the jacket with the left panel folded down.

Outside view of the back of the jacket.

Outside view of the front of the jacket.

I didn't show the pieces being sewn together since it's just straight lines.
I think this was the cuff although now I'm not totally sure why it was cut on the bias.
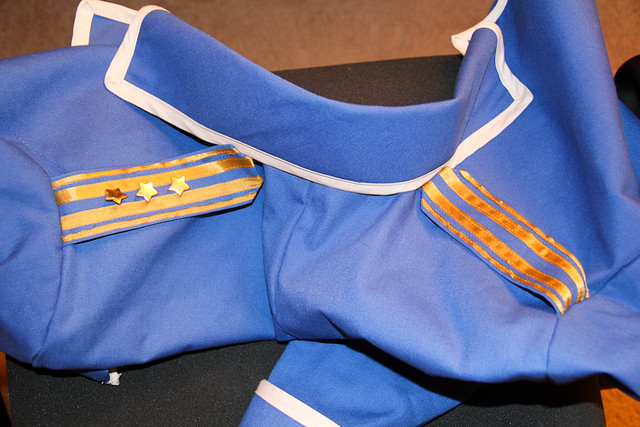
I was in a rush so there's a lot of step by step pictures missing. I attached the sleeves after much frustration. One of the tricks that someone used online was to sew on the inside of the sleeve cap with the entire sleeve through. It's hard to describe so just look up some videos. Sleeves are quite tricky so just go slow and keep checking where you are. The collar was really straight forward to attach. I used heavy interfacing on both the collar and the cuffs. Everything had bias tape added to the edge (it's easier to add them to the collar and cuffs before attaching to the jacket). You should also sew the epaulet into the seam between the jacket and the sleeve when you're sewing the sleeve on since it's easier than trying to sew it on later. If you're going to be a Colonel make sure you have 3 stars and a round button at the end. I saw a few people that had incorrect rank information.
Accessories
Speaking of rank information, Roy Mustang has two collar pins on the right collar and a bar of ribbons that sits on his left breast. His right side has the cord that wraps around his shoulder (going under the epaulet) and connects to another length of cord by a T connector sitting under his arm. This connects to a piece of metal that loops into a ring on his right chest.
I made all the collar pins myself out of an aluminum can using this tutorial I found on "Drink Can Tinwork." The tutorial shows a small decorative box being made but it was a perfect method for making the collar pins. I actually saw the tutorial just days before the convention.
A regular soft drink can. I grabbed this from the recycling bin at school so it was totally free.
Cut the top and bottom off.
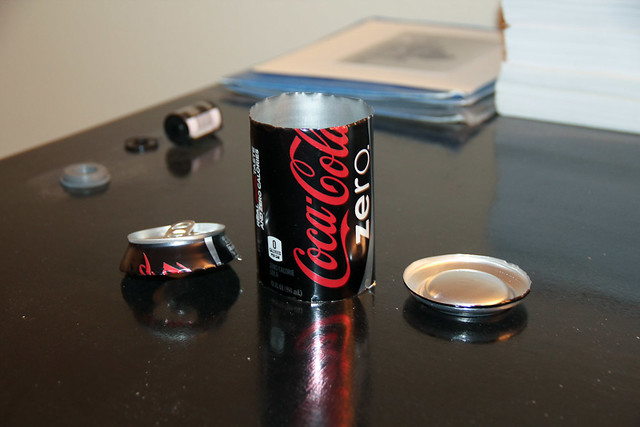
After cutting down the side you now have a flat piece of aluminum.

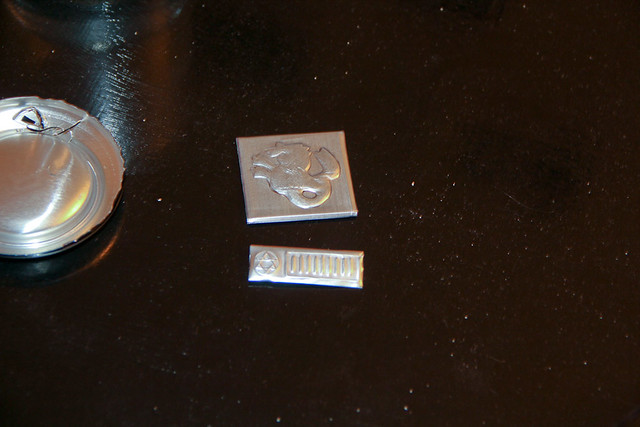
I found a good image of the design on the pin and drew it out on a piece of paper. I then lay the paper directly over the aluminum and traced down really hard. Make sure you have something underneath so you don't ruin the table (I used a piece of cardboard from a cereal box). If you trace hard enough you can remove the paper and just trace over the design a few more times. Since the entire image is raised, I had to "shade in" everything by using a crosshatching technique where I scribbled in straight lines across the entire design one way, then switched directions and repeated. I did this from a total of 3-4 directions.

The bar pin has a circle with what looks pretty close to a Star of David inside. The right side of the pin is a rectangle that has 9 vertical lines inside.

If you scribe really hard the sheet of aluminum will bend right there, making it easy to just snap it straight across. You can see the hand drawn image that I mentioned earlier.
The finished collar pins. I attached them using hot glue to a safety pin so I could attach them to the collar. The small rectangular pin actually popped off pretty quickly at one point when I accidentally hit it moving my shoulder. I found that one way to attach it is to leave some aluminum that you can fold behind so it forms a channel. This way you can hot glue a flat piece of plastic to the safety pin that will slide into the channel. You can push the top and bottom aluminum tab in the back down so it'll clamp onto the rectangular piece holding the safety pin in. There's a lot of ways you can attach it so just find a method that works for you.
I made the rank bar using ribbon and plastic from a yogurt container. I cut out a piece of plastic and bent it by hand until it would stay relatively flat. I then hot glued sections of ribbon to it. I hot glued one end of the ribbon to the back, wrapped it around the front and then hot glued it again in the back.

All of the ribbon was the same width, 3/8" wide. I used grosgrain ribbon since it's similar to actual military ribbon material. There are four colors - green, white, red, and yellow. Each row is 8 ribbon widths wide.
Top row: 2G, 1W, 2R, 1Y, 2W
Bottom row: 2Y, 2W, 2G, 2R
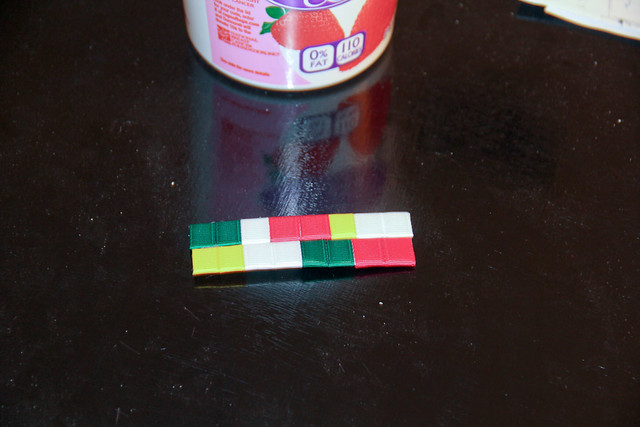
The back shows that I attached the two rows together using three plastic pieces hot glued to it. This way there is still some flexibility to the entire piece but it holds together pretty well.
A safety pin was also hot glued to the back to allow for attachment to the jacket.


Closeup of the collar pins.

Closeup of the rank badge.

Boots
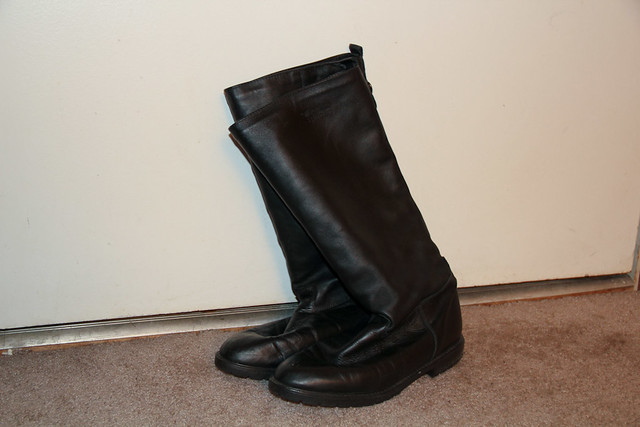
Try to find some that go about halfway up your shin. Don't get military boots since those are usually lace up. I found a pair of black boots for $10 at the local thrift store.
Gloves
Use white cotton gloves. There are some gloves out there that are fancy and have ribbed ares running on the back of the hand. Don't get those since Roy Mustang's gloves are flat and smooth on the back. The Alchemy symbol on the back of the glove is the Alchemy circle that was passed down to him by his mentor, Riza's father. There's a lot of images out there of what the circle on his glove looks like.
Final Result
A picture of me testing everything out.

If you have any questions on anything feel free to ask. That way I can add more information to this if necessary. I might also be able to provide more images if anyone needs a more detailed view of something.
Great tutorial! It's really helping me re-make my military uniform.
ReplyDeleteThanks! Great to hear that it's helpful. Let me know if there's anything else that you need to know so I can fill in any missing information and improve the tutorial.
ReplyDeleteSure thing!
ReplyDeleteOne question though, how do you keep the jacket closed? I think in the anime it was by the work of snaps, but I'm not really sure.
I'm using a total of three snaps:
ReplyDelete2 in the front bottom at the furthest point where it overlaps
1 at the top to hold it closed at the neck
You can certainly use more if you need but I think that those three are probably the minimum needed. You don't need really large snaps but just make sure they're sewed on nice and secure - I was in a rush the morning of the convention sewing the snaps on so I only went around each snap with maybe 2 loops of double knotted thread and one of them actually came out towards the end of the day.
I have a noob sewing question...How did you sew the top of the "butt cape" together? Did you have to trim anything off the lower half of the cape to allow it to spread towards the bottom rather than just having a straight split down the back and bottom?
ReplyDeleteNo trimming of the bottom was involved. If you look at the pdf of the patterns the two sides are symmetrical. What I did for sewing the top was to sew at a slight angle (maybe 1/2 inch offset at the top). What that does it make the slit flare out just slightly. It's very subtle but I think it's necessary so the back doesn't overlap as easily. Once you wear it the back also comes apart a bit just based on how it drapes on the body.
ReplyDeletehow did you do the gold cord? how did you attach it under the arm and what did you use to attach it to the front of the jacket?
ReplyDeleteThe gold cord was found at Jo-Ann's. It was labeled as 1/4" antique colored large twist cord. I couldn't really find it online but it existed in the store. It's attached in the front by a metal piece that has a loop and goes through the circular ring that I got from an old keychain. The metal piece is made from the aluminum can that I used for all the metal parts. I'll try to get better pictures of that area.
ReplyDeleteHI, I am a graphic design student in AAU. Recently I am doing project about cosplay. You are tutorial is so cool, may I put this in my book? Of cause I will put your name for this. Thank you so much
ReplyDelete@_@ Wooow, this was an amazing tutorial! Thank you so much! *saves page*
ReplyDeleteYeah go ahead and feel free to do so. Please send me more info about your work when you get done. If you need any additional info, feel free to send me an e-mail (crazedpanda@gmail.com)
ReplyDeleteI'm a rather tall individual, could you give me your dimensions (waist, height, etc.) so I can conform the patterns to a six-three figure? (not to mention a few others for some friends of mine who are making them with me)
ReplyDeleteYeah no problem. I'm 5'5" with a waist of 28 inches. You'll need a lot more measurements that that to make a pattern that fits you well. Like I said, for the pants I just used a pair I had and reverse engineered it. For the jacket you might have to take a few more measurements and improvise a bit. I don't really have much experience with making clothes so I'm afraid I might not be of more help. I learned a lot of stuff from reading a lot from various sources and a lot of measuring. It's easier to measure 10 times than it is to make a mistake. I spent a solid week just planning everything out before I had the confidence to go ahead with cutting out the fabric. If you need any more help just ask and I'll get back to you ASAP.
ReplyDeleteThanks, your pattern for the jacket is making this like fifty times easier. You also had a great idea for the collar pins that used, thanks again.
ReplyDeleteNo problem. Glad I could be helpful.
ReplyDeleteI would like to know were you got your star and flat silver/grey buttons? For I'm having a hard time finding any star buttons that aren't the childish style or non patterned silver/grey buttons.
ReplyDeleteI got the stars in a pack of around 10 or so at Jo-Ann's. The gold buttons were also from Jo-Ann. The large silver buttons were from Wal-Mart (the one by me actually has a fabric department so you may not be able to get them at Wal-Mart. I think I spent around $5 on all the buttons.
ReplyDeleteI have a question regarding the collar accessories.
ReplyDeleteDo you by chance have exact measurements for the pins?
I am trying to do it and it's starting to bother me some.
Maybe a step by step tutorial on how to do each pin with more specifics?
Thank you!
The large square pin is 1.5 in. x 1.5 in while the rectangular one is 1.5 in x 0.5 in. I took reference images and studied them to draw up the designs. The actual designs were more or less free drawn on there. It took two tries to get the lion the right size so no I don't have accurate measurements. I might do a step by step tutorial at a later time but I've been pretty busy lately and probably don't have time do do a tutorial that's more in depth than the one I have. The images I have should show a relatively good progression of how I made it. Be sure to take a look at the video I linked to as well since I kind of made up how to do the pins based on that technique.
ReplyDeleteAlright, thank you very much. for the large pin those measurements were want I needed as well. I was pretty much eye balling what you have shown in the tutorial and It's good to know I was accurate with what you have. Only thing I'm more curious of that I want to have confirmed are,
ReplyDelete- when you made the pin bulged you used a pen or something similar and pressed in the outline of the lion and the pin it's self right?
- Second and last, during the tutorial How exactly did you fold over the backs of the pins, every time I do it they crack and break. :/
Thank you and my apologies if my questions are annoying.
When I made the raised pattern for the lion I went over the design at least 4-5 times trying to go in slightly different directions so it's harder to tell the lines used for the "shading".
ReplyDeleteWhen I folded some edges broke for me too. I managed to only have 2 broken edges by doing it carefully. Just go slow and don't score too hard before you fold.
Out of all the royal blue fabric, how much did you use up actually? And what should I search to find the gold cord on Jo-Ann? Thanks in advance
ReplyDeleteI only used about 5 and a half yards. I'm 5' 5", 130 lbs. and I also didn't make any mistakes cutting things out.
ReplyDeleteThe gold cord is by the brand Simplicity Trim (from Joann) and I just got the thickest one they had. I believe the color is called "antique" and I really can't recall the specific thickness. I got a yard of it I believe and they cut it for me right there. It was $1.79/yd. I did a quick search for it online but had trouble locating it so it's probably easiest if you just go to the store and look for it. I'm sure other stores would carry something similar so it's not like you have to get that specific one from Joann.
Sorry, I found the answer to my 1st question, but do you have any advice on where to get assorted buttons?
ReplyDeleteI answered part of that to a previous user. Look above for the answer to that.
ReplyDeleteI got all the buttons between Joann and Walmart (ours is one of the few that has a fabric department). Just look for buttons that are about the right size and color.
Hey, I just wanted to thank you for this great tutorial. I was kind of in a hurry when doing my uniform, because we just came up with the idea of doing this four days before we needed it and I was just about to totally screw up the fabric I had... In short, your tutorial really saved me. ;)
ReplyDeleteThanks! I'm constantly amazed by the feedback I get about this tutorial since this is really my first time sewing and I kind of made up some stuff as I went. I'm glad that it's so useful to everyone.
ReplyDeleteIt's only my second time sewing something as well. *laughs* Maybe this tutorial is so popular, because it's comparably easy to understand -- and not in the bad way, mind you. ;)
ReplyDeleteFor me, as a Non-Native Speaker, it's incredibly complicated to follow those "professional" tutorials, where every third or fourth word is a term I have never even heard before and where dictionaries either fail me completely or give me a translation that gets me about as far as the original word. All I can do is guess my way through them and hope the result is at least remotely acceptable... So I kind of loved how you just put things into simpler words instead of using sewing terminology.
(I'm still envious your first attempt at sewing turned out this well... Guess that's what you call natural talent. =P)
I'm glad to hear that it's so accessible and relatively easy to follow. If you have pictures of your finished work please send me a link to the picture(s) - I'd love to see how yours turned out by following my tutorial.
ReplyDeleteHow long would you say this took?
ReplyDeleteA week working a few hours a day. All in all I would estimate 20-30 hours? Hard to say for sure since I was watching TV while working part of the time. This estimate includes making the accessories as well as sewing on all the buttons, etc. The last part was also done with hand stitching instead of machine stitched so it should be a bit faster if the entire thing was done using a machine.
ReplyDeleteWill do. ;D But it might take a while cause I don't have a camera of my own, so I have to wait until my friends (or the people who took the photos) actually send me the pictures... which usually takes just about forever or so...
ReplyDeleteDid you use a sewing machine for this or did you sew by hand?
ReplyDeleteMost of it was done using a sewing machine. I would have done the entire thing on a sewing machine but I didn't have access to one at the end so I did the last part by hand. You can do it either way but I'm pretty sure the sewing machine is a lot faster.
ReplyDeleteFirst off, let me say that this guide is amazingly simple and has become my bible for my next cosplay project. (my friend and I are doing miniskirt riza and roy so we just substitute a skirt for the pants)
ReplyDeleteI do have a few questions though.
First, I noticed that you said your waist was 28" but I saw that the top measurement of the butt cape adds up to be 28" if I go by the pattern. Is this a mistake? I'm not sure how wide the top of my own buttcape should be (I have a 36" waist) and I would rather not make a wild guess.
Second, they sleeve drafting tutorial is now giving me a 404 error message. Would you happen to know if it moved elsewhere? or do you know of another place that would have a decent tutorial? (if not then that's okay, I can work it out based off one of my own coats/jackets I guess)
Last, the grey cotton/poly fabric you used for the belt... is that at all similar to quilting fabric? I'm really really limited in supply stores near my college so I'm going to be buying the blue canvas and the bias tape from joanns online. This makes the grey fabric tricky though since I can't match colors just from online pictures.... so I'm hoping I can just track down one of the quilting stores around here, but do you think that sort of fabric will work?
Thank you SO much for this fantastic tutorial. I've got a little sewing experience, but having simple instructions and even simpler patterns (those store ones have always confused me) is amazing.
I was wondering if you had a pattern of; or have made Ed Elric's red coat? I would love to see a tutorial of that. I can't seem to find that anywhere. By the way, your Mustang costume and tutorial of how to make it is by far the best I have ever seen. Great job.
ReplyDeleteI just noticed your comment and thought I should direct you here: http://nekonariko.deviantart.com/art/Edward-Elric-Coat-Pg1-207255565
ReplyDeleteIt is a two page translated pattern/tutorial on how to put together a coat much like Ed's.
you can see mine here: http://sironaselkie.tumblr.com/post/8155413339/i-am-so-immensely-in-love-with-this-jacket-lets
The only adjustment I made to the pattern was to make the back one piece rather than two so that there was no seam interrupting the Flamel Cross. (I also made the sleeves simpler but I kinda regret that so try to find a good sleeve tutorial)
Mine has fleece sandwiched in between the outer wool suiting and the inner lining to make it a bit warmer, but you can probably find advice on good light materials in a forum somewhere.
Best of luck, feel free to ask me questions if you don't get a reply from pandamajik! My email is sironaselkie @ gmail dot com
No I don't have Ed's red coat. See the response by SironaSelkie.
ReplyDelete1) The butt cape does not go all the way around and ends about halfway across the thigh. That's why the measurement is like that.
ReplyDelete2) Sorry I don't know of any other site off the top of my head. I'm sure there are other sites that would have similar information about drafting sleeves.
3) I'm not totally familiar with what "quilting" fabric is but I think it should be ok. It's hard to say without looking at the fabric. Your best bet is to just feel the fabric and if it's acceptable just go with it. The good thing about the belt part is that it's small so you don't need a lot of fabric.
Sorry for the time it's taken for me to respond to this. I've been really busy and as you can see the site is more or less in archive mode since none of the other writers have time for this anymore. I'm moving all of my personal projects over to pandamajikhobbies.blogspot.com
Hi there!
ReplyDeleteErm, I really hope you are still around here and check the posts...sometimes.
I'm stunned by the awesomeness and simplicity of the tutorial. It's the most helpful things I found in regard to my cosplay plan. Thank you) Can't wait to start!
I do have several n00by questions though.
First of all, I tried to substitute my measurements into the patterns you've made, but ended up just confusing myself as I wasn't sure which one goes where. I guess I should mention that I have some sewing experience. I did some work with patterns and sewing machines, so I'm not so hopelessly lost. Yet, your pattern did confuse me. Maybe you can tell me what measurements to use where? I would really appreciate that.
Second thing is, I can't see any pictures. It makes me quite sad, because visual reference is just what I need. Maybe you have them stored somewhere?
And the last thing is...erm, I might have missed it, but did you sew the the parts together by hand FIRST and then did the same on the machine and took out the hand-sewn stitches? I'm not sure if I should do that, because it will take quite a while, but then it gives me a room for mistakes.
Thank you for the tutorial once again!
To be honest I've never actually used a pattern and I'm only vaguely familiar with what a pattern even looks like which is why mine is probably not as useful as an actual pattern. My process in constructing the patterns was a hybrid between draping and patterning. I don't have a dressform or anything similar so I took some clothes I had, took measurements from those and combined them with measurements I took of my body. The most mathematical part was the drafting of the sleeves but it seems like the site I got it from is no longer up. With that said, I'm sure there is someone else on the internet that shows sleeve drafting since the images used on that site looked like they were scans from decades old books. I'm sorry I can't be more helpful but I don't know enough about sewing to help you modify the dimensions to your measurements. The best thing to do would probably be to make a rough estimate, cut it out of newspaper, and see if it works. I had to run through a bunch of trial and error on my patterning to get the final one you see.
ReplyDeleteI hate sewing by hand so none of the seams were hand sewn first. I did as much as I could on the sewing machine when I was home and only had to hand sew the gray top part of the butt cape. Aside from that I did hand sew all the button holes but that could just as easily be done on a machine.
About the picture issue - I've been busy and haven't had time to relocate the images to a new location since some of the images for the original site were hosted on the actual site through the use of a gallery plugin and due to the transfer to Wordpress.com those images did not get moved. Hopefully I'll have time in the next few days to rectify that situation.
If you have any other specific questions I'll do my best to try and help.
Wow, you replied so quickly! Awesome!
ReplyDeleteWell then, I guess I will have to just go with it and try my best, haha. I'm also promised some help from a random professional costume maker, so that might work out even if I mess up badly,
I see, I see. Perhaps I should decide on whether to sew by hand first or not later on, once I'm done with paper models. Thta seems like a smart thing to do.... You are lucky to have a machine! I will have to use the school's equipment, which results in fair time limits.
As I said, I would absolutely love to see the images, but, of course there's plently of useful info even without them.
Thank you for the help!
!! Wow! I'm so excited to have found this! I'm planning to make this for a con in August(plenty of time~), and was looking around to see if there was someone who had a pattern! This looks great! And very simplistic too~ I have only a little experience sowing, but my mother has tons(practically a seamstress), so that should help~ I will say, I was beginning to worry about how in the world I was going to make the collar buttons, but what you did was brilliant! I recently used a soda can for a different project, and getting it to be flat is like pulling teeth... Any tips on how to get it nice and flat?
ReplyDeleteThanks! I'm glad this can help people out even several years later. I didn't really have any prior experience with sewing when I made this so it shouldn't be too difficult if you're careful. For the soda can I think what I did was roll it the other way on the edge of a table until it was relatively flat. It's difficult to get the entire thing flat but it's not necessary. When you cut a small section it's much easier to get it to look flat. Plus, the tabs you fold back help give it some additional rigidity. Hope that helps!
DeleteIt helped a lot! Thanks~ I'm done with the accents and am going to be sowing everything together soon, but one thing I can seem to figure out is how you made the lappets with the gold stripes. Thanks again!
DeleteWhat was your bias tape's width?
ReplyDeleteSorry for the delayed reply. I can't recall if this is accurate, but based on the pictures and my recollection I believe it was 1/2" (13mm) wide double fold. If you look at the images with both the bias tape sewn onto the jacket as well as the military ribbon bar, you can compare the widths. The ribbon I used for the ribbon bar is 3/8" and the bias tape on the jacket looks slightly wider.
DeleteGood luck with your cosplay!