Colossalcon this past summer was my first anime convention and I had a lot of fun so I am planning on attending Ohayocon 10 at the end of Jan, 2010. One of the largest aspects of anime conventions is cosplay. For those who do not know, cosplay is dressing up as some character from a show, game, movie, or anything else. Basically people pick characters they like and dress up like them.
My planned cosplay is Strider Hiryu from Marvel vs. Capcom, an arcade fighting game a friend introduced me to back in high school. I only played the first one so I will be basing the cosplay on the character design from the first one.
The bulk of the clothing has been completed since that's what I worked on when I went home for break. My mom helped out a lot since she has a sewing machine and a good amount of experience with it. The woodworking was done by myself with a few tips from my stepfather. This is my first time doing any sort of cosplay so there is certainly a lot that I can improve, but I see this mostly as a learning opportunity. Hopefully it will allow me to pick up a lot more skills like sewing, woodworking, and painting.
Pants
The pants were probably the easiest part of the clothing. We first watched a video on Youtube to get an idea of how other people made the pattern. Then we took a pair of pajamas, turned it inside out and took a look at the shape of the front and back piece of cloth. We decided the best way to approach it would be to cut four pieces of fabric, one for each leg front and back. The hardest part about it was to put curvature at the top for it to conform better to the body as well as account for a few inches extra when sitting down.
As far as stitching everything together, the two halves of the front were joined as well as the two parts for the back. After that, the front and back were joined and then all the edges were hemmed to make it look better cosmetically as well as prevent the edge from fraying. An elastic band was put in to serve as a waistband.
Shirt/Vest
The shirt looks like it is similar to the Japanese "gi" except that there are no sleeves. Unfortunately I did not bring my kendo gi and hakama home so there was no really good template to have on hand. We ended up using a T-shirt as the base template and constructing it out of a total of 3 pieces - one for the back and one for each side of the front. The right half will fold over to the left first and then the left flap will fold over to the right. The left side will be the one that will be most visible when completed.
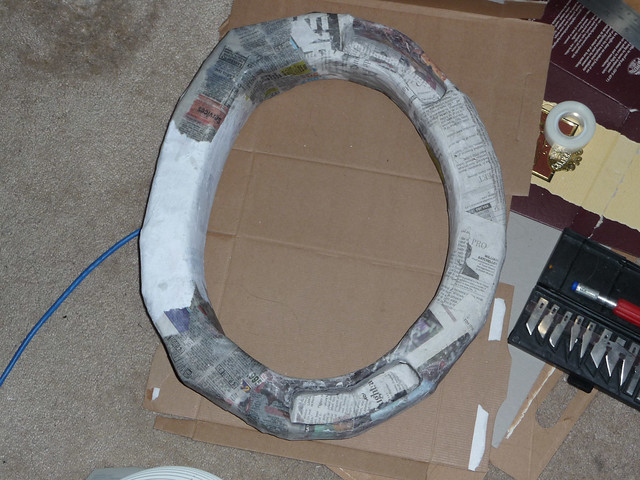
One of the tough parts was finding the right curvature for the two halves to make the V-cut in the front look right. We first used newspaper to make the pattern and to get an idea of what the finished product will look like.
The sewing of the three parts was relatively straightforward. The one additional detail is the addition of approximately one inch bias tape on the collar and around the edge of the two halves of the front. Bias tape needs to be cut at a 45 degree diagonal in relation to the fibers of the cloth. The other tricky part was the sleeve since it shouldn't be too short or too long.
Cypher Sword
Strider's signature weapon is his cypher called the Falchion. The cypher is triangular in shape but fairly long, about the length of the legs. There are two handles, much like a tonfa. I had great difficulty in getting any good reference pictures for this and spent a lot of time deliberating over how to make it. I sketched up a rough design in Solidworks but when it finally came time to make it I decided to redraw it by hand. I settled on using the sprite sheet from the original Marvel vs. Capcom as my base reference.
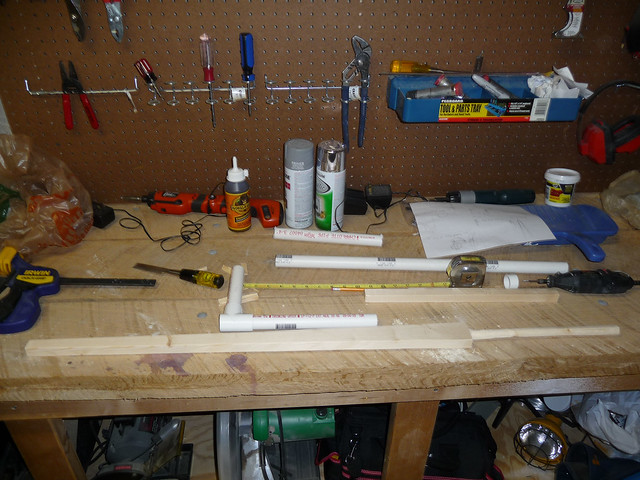
I am using some leftover wood we have (I believe it's from when we finished our basement). The wood is 3/4" thick whitewood, which comes from spruce and is similar to pine but a little less dense and is also softer. The handles are constructed from PVC pipe and I am using a T shape connector at the center. There are pictures with the shorter handle (the one perpendicular to the handle in line with the blade) both in the same plane as the edge of the blade as well as on the plane of the flat of the blade. I will be going with the handle in the plane of the edge of the blade as it is the logical way for him to execute the attacks shown in the game.

The handle was cut partway with the table saw and finished off with a hand saw and chisel. This is becuase the table saw cuts more of the wood at the bottom as opposed to the surface which is only important when not making a complete through cut. The handle was cut to fit inside 3/4" PVC pipe (inside diameter) so I had to file down the corners of the handle to make it rounder (basic trigonometry in action). The PVC size was chosen because of the maximum thickness of the wood.


After drawing the design of the blade onto the surface of the wood, I
cut a scrap piece of wood first that had the same angle as the angle
that the blade is shaped. This will allow me to still use the guide rail
on the table saw I'm using. The problem is that the angle is very
shallow so even with the piece of wood and the guide rail it was still
difficult to get the cut accurate. I more or less free-handed the second
side and ended up going in about 1/16 of an inch about halfway down.
It's not too noticeable but when I compare the two sides I can see where
it's at. The faces were also cut at an angle to make it more like an
actual blade, but I kept about 1/4" thickness even at the edge to make
sure it would be structurally sound.


The next step was to cover the handle in Gorilla Glue and then let it sit for about 10 minutes. The glue will expand some during this time. During that time I secured the PVC handle to the T connector using PVC primer and cement. If you use that be sure to act quickly since it sets in about 30 seconds. After inserting the Gorilla Glue coated handle into the PVC+connector, I let it sit overnight. The next morning the glue had expanded to fill the inside of the pipe, ensuring a secure bond.

I had a lot of difficulty with building up the trapezoidal part covering the connector on the weapon. I first cut out the shape I wanted using cereal box cardboard and attached about 3 layers on each side with some Bondo to help fill the space since the connector sits at a larger thickness compared to the actual blade. This was then covered up using papier mache with a mixture of flour and water as the glue. I applied about 10 layers of papier mache using a hair dryer to speed up the process and allowing me to do more than just one layer a day.
After getting the rough shape I tried to use some plastic wood (a type of wood putty) to cover the outside and provide a smooth surface to paint on. The wood putty did not go on as well as I had hoped and it didn't bond very well since it would just break off when I tried to sand the edges.
After getting it as smooth as I could I covered it with an additional layer of the papier mache glue, which actually self leveled some. The entire thing was then primed using Rust-Oleum Automotive Primer (same stuff I use for my models) and then sanded using 100 and 400 grit sandpaper. Then the whole thing was primed again and wet sanded using 400 grit sandpaper.
Finally I covered it using Rust-Oleum metallic spray paint in a silver color. It's shiny, but not quite a mirror finish like chrome or polished silver. I'm not completely satisfied with how it turned out and might have to repaint it later but for now I need to work on all the other props.
To Do
- Paint red kanji onto shirt
- Make grappling hook and holder on back
- Make the brown straps for his arms
- Make the white belt
- Tabi socks
- Sandals
- White bandages for arms, ankles, and feet
- Red cloth for wrapping waist and for the face mask + scarf